Monday, March 21, 2011

Class Pets Venn Diagram

This week for our comprehension skill we are reviewing how to compare and contrast. On Mondays and Thursdays we have Reading Lab which is an intervention that we have put in place for our struggling readers.  During that time block, I keep my students that don't need reading interventions and I do extension activities with them.  This is what we did today.  

Meet our class guinea pigs!!  Their names are Spike and Rose.  This is the second year that I've had them and my students just LOVE them!  They take turns feeding and watering them with our jobs chart (I'll post later). 


I have their cage in a plastic storage bin which completely gets rid of the mess factor!


I printed little guinea pigs and gave them to my students.  They wrote adjectives about our piggies and then we posted them on our venn diagram door.  


Do you have class pets?  How do you incorporate them into the curriculum?

Thursday, March 17, 2011

Cute Recycled "Buckets"

I wanted to share this idea that I have for cute CHEEP and GREEN containers/buckets.  So far I have used these little babies for Valentines Day and for my "bucket filling system" (an idea I got from Rachelle!).  They are super easy and SOOO cute, plus my students LOVE making them!!!

First of all I have to thank our fabulous lunch lady extraordinaire Teddi.  She saved and rinsed the big cans from peaches and pears from the kids lunches.  

We turned them into these:


Also, I have to give my fabulous husband a shout out because he has been saving dog food cans for the past year and half.  If I let him he would save everything, he is just that resourceful!!  He was saving them to recycle but our cute little town is not equipped with a recycling service that takes tin as of yet, sad I know!! 

We turned them into these: 


So are you dying to know how to make them yet???


You will need:

~ Cans the size you want them
                                                     ~White duct tape
                                                     ~Paper
                                                     ~Super cute ribbon of your choice
                                                     ~Hot glue gun
                                                     ~Paint

Clean the cans and remove any label.        

Cover the opening edges with white duct tape (I got mine at Wal-Mart in the painting section).

Hot glue the ribbon near the edges.  
 Cut paper to the size of the can and glue with the hot glue gun.  
Then let students decorate. 

Is this something you'll use in your classroom?  What other ways can you think to use them?


Wednesday, March 16, 2011

What I Be

I love integrating character education into the curriculum.  I think that having good character is one of the most important things we can teach our students.  This lesson combines five of my greatest loves... childrens books + Michael Franti's music + character education+ creative writing + art!!!  This super cute story is one of Michael Franti's songs turned into a childrens book.  If you don't know about Michael Franti today is your lucky day!  He has been such an inspiration to me since I first saw him in concert in 2003.  I have seen him six times in concert in three different states and he always puts on an ROCKIN' show!  I even got to meet him in 2007 :)  He recently performed at NAACP awards and on Jay Leno!   

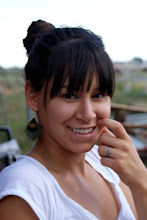
(This is me and my cute husband at Solar Festival in Taos, New Mexico last summer.)

 (This is Michael Franti at the end of the show when he calls all of the kids on stage.)
Go to www.spearheadvibrations.com to learn more about Michael Franti and Spearhead.

 This book has BEAUTIFUL illustrations and very creative music.  It comes with a CD too!  The song is the words in the book so you can play the CD right along as you look at the book.  The music is a combination of Michael Franti, Youssoupha Sidibe who does vocals and plays the Kora a traditional West African Harp, and Ade Franti-Rye Michael's son.  It is also great to have in a center!!  My students LOVE it, they dance and sing a long as they listen and read it!!!


Click on the picture above for the link to purchase this book.

Here is a peek at the book...


This is from the back of the book:  What I Be, is a visual and musical journey about self acceptance.  It's okay to be just who you are and strive to be the best you can be, by embodying the most inspiring characteristic of nature.  Be as radiant as the sun, as healing as the rain or as generous as a tree.  


(For upper grades this book would be a great example for metaphors.) 

In the back of the book there is this page for students to do some creative writing, I have each student create their own part of the book.


Then they get to illustrate their page.  Here are some student examples:


"If I could be a deer I would dance and make people happy!"

 "If I could be a tree I would grow food for the whole world!"

 "If I could be a slide I would be so, so, so slippery.  So the kids can have fun!"

 "If I could be fishes, I would set earths peace by being glimmery and shiny!"
 "If I could be a tree I would grow a house!"

 "If I could be a lion I would save people from a robber!"

 "If I could be the dirt I would let people grow trees in me!"

"If I could be a butterfly I would fly so high in the sky!"

Monday, March 14, 2011

Seeds

I wanted to share this awesome investigative activity that my second graders did today.  

First we watched this video at brainpopjr.com If you don't have an account set up with them you can set up a free 5 day trial!  All you have to have is an e-mail account. 


Click on the picture for the link to the video.
The night before I do this activity I soak lima and pinto beans in water, enough for one per person each.  Then, I give each child a magnifying glass (oh the excitement!!) and bean of each kind.  I let them investigate the seeds.  They usually figure out they can take the seed coat off pretty quickly.  I prompt them to tell me what they see.  It's really awesome because you can see the first root (also known as the radicle vocabulary word!!)  and the baby leaves in boths beans with just letting them soak over night.  They grow so fast!

 Can you see the radicle and baby leaves?


After they've had time to explore.  I pass out their very own bean book.  I use this one from enchantedlearning.com 

 Click on the picture for the link.

The last part of this lesson is each student gets to make their own green house.  They get a plastic sandwich bag and a paper towel.  (I pre-write their names on their bag with sharpie) They wet the towel at the drinking fountain (we're lucky the fountain is just outside our door, we don't have a sink in our room).  Then they put one lima bean and one pinto bean in the back on top of the paper towel.  We taped them to the window and will check them in two days.  We'll continue to check them for a couple of weeks or until they start turning moldy.  


What do you think?  Is this something you might try in your classroom?  Thanks for stopping by!

Thursday, March 10, 2011

Terrarium Teaching

Hey everyone or should I say anyone?!  This is my first blog post!  I've been really inspired by all the fantastic teaching blogs out there.  I was feeling left out so I had to join in on the fun.  This is a project we've been working on this week as part of my plant unit. 
(It was so hard to get a good picture, those are my feet in the reflection, don't tell my students I was standing on the desks!!)

My amazingly generous Aunt Dawn donated this aquarium to my class last year.  We have turned it into a terrarium.  My students helped with filling it with soil organic material, sand and rocks.  Next, I showed them two different types of seeds.  I had them make predictions about what the seeds will be when they mature.  My second graders are so smart, they wanted to smell the seeds to help with their predictions!  They each drew a picture of what the terrarium will look like in May and wrote their predictions down.  

I made this display and taped some of the seeds to the cute little seed packet graphics from DJ inkers.  


I'm not going to tell my kiddo's what the seeds will be but they'll figure it out because they each had a chance to plant them and several of them are planted right up against the glass.  Last year I used radish seeds and it was really amazing to see them grow.  I couldn't believe how long the roots were and how many roots belonged to such a little plant!  We did not plant radishes this year!  

Does anyone have a guess what they might be?


I created this worksheet for the predictions using DJ inkers fonts and borders.  Click Here to download the sheet.   


Here are some student examples:


After that I let each child plant a seed.  We used jumbo craft sticks to mark where their seed is.  We wrote their initials on the sticks.  The terrarium will be overflowing with foliage pretty soon.  I'll post pictures a long the way!  

 This morning during phonics practice there was a beetle on the rug.  My students wanted to put it in the terrarium so we caught it and let him loose in the soil.


Here is the foldable to tape your seeds onto, click here: