I am incredibly lucky to work with Lynae, the very creative math specialist extraordinaire! Her job is to create engaging math centers to help fill in the gaps in our students learning during our interventions time. She does this for k-6 grades. Every week! She is AMAZING!!
This weeks she came up with this fantastic idea. She used the beloved Dr. Seuss character the Grinch in the most fantastic way.
She found an image on google, printed them off, cut off one arm and taped it to make the greater than and less than signs! She put glitter glue to emphasize the signs but some of my little darlings pulled it off. :(
Then she made Santa bags with different numbers on them. Our students had to put the correct Grinch in the middle to show their understanding. {LOVE IT!}
What do you think? Is this something you might use in your classroom?
Friday, December 16, 2011
Sunday, December 11, 2011
Get 'em While They're Hot! Coin Posters Freebie!
So I ordered DJ Inkers Kidoodlez: Science and Math CD. Let me just tell you.....I LOVE all of the super cute and useful images that come on this CD!
(Click on the picture to get your own copy!)
There are so many fantastic images to use. This is the first resource I have created with it. I have updated my money posters and created one for the half dollar which I didn't have. I am not the greatest poet so if you know of or think of a better poem to use for the half dollar please let me know and I will make a poster with it!
(Click the picture to grab a copy of the Coin Posters)
Please leave me a comment if you download the coin posters! I love hearing from all of my blogging friends! {HUGS}
Thursday, December 8, 2011
Hooray For Awards!
Big thanks to Barb from Grade ONEderful for awarding me the the Liebster Blog Award! Isn't she a sweetie! I feel so special. Now I know how my student of the week feels when they receive their certificate! ;) ?
The goal is to spotlight 5 other up-and-coming blogs with less than 200 followers!
Here are the fabulous blogs I am passing this along to :)
Congratulations blogging buddies!
Wednesday, December 7, 2011
Easy Peasy Symmetry
Today I introduced symmetry during math. First I showed them what symmetry meant using our bodies as an example. Then we used shapes and we practiced drawing lines of symmetry on them. We folded them on the lines to double check that they were actually symmetrical. After that we created these fabulous symmetrical works of art!
So here is an easy art project that is sure to get oooh's and aaaah's from all of your little darlings.
First have your students fold construction paper in half hamburger style. Then go around and ask each child what colors they would like. I let them choose three colors.
Next fold the paper back up and spread the paint out by pressing on the paper from the fold to the front opening. If they spread it from side to side it will spill out the sides and be really messy.
When they open up their paper they will find a beautiful symmetrical painting will have appeared like magic! Followed by the oooh's and aaaah's...
Helpful hint:
I put the paint in a shower tote so that I can easily carry them from table to table.
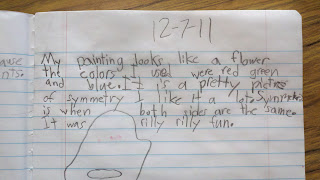
Then I had my students write about their symmetrical paintings in their math journals. You know how the Common Core loves for our kiddo's to write about math!
They had to answer these two questions in their writing: What does your picture look like? What does symmetrical mean?
Here are some student examples....
and
Friday, December 2, 2011
A pinterest inspired Christmas!
Is it Friday already?! This week as FLOWN by! We have been super busy and I wanted to share a few things we accomplished this week.
I was pretty inspired by this cute door I found on pinterest. One of my parent volunteers brought this super fun work of art to life on our classroom door!
Let me tell you it has been that talk of the first floor, the kindergartners especially love it!
I also loved this cute Grinch idea I found also on pinterest.
I made him by using my elmo document camera to shine the picture onto my smartboard where I taped a piece of green paper and then traced the outline of the Grinch. Then I had it laminated.
My students are going to catch their classmates in acts of kindness. Write them down on a heart and tape it to the Grinch.
I have a basket with red paper, scissors, a marker and I added tape after I took this picture.
Update:
Look how kind my class is!
Remember Rachelle's post about 3d leprechauns back in March? I used that idea and we made Santa's Elves instead.
The placement of my elves is totally driving me crazy. I had my cute student service learner from the high school hang them up. :) I didn't have a Christmas border so my students made their own.
If you want the posters I made for the Grinch or Santa's Elves leave me your e-mail and I'll send them to you! I have to go to a faculty meeting now :)
Labels:
Christmas
Saturday, November 26, 2011
Double Consonant and CK Spelling Hunt
Last year my school adopted the Journeys reading program from Houghton Mifflin! I LOVE it! It works SOOO much better for me and my students then the program we had the first year I taught. This week our story is...
The Ugly Vegetables by Grace Lin
Click the spud to grab a copy :)
Our spelling sort this week focuses on double consonant words and reviews ck words. My students love when we write around the room and so I made a vegetable hunt to introduce them to their spelling words for the week.
I hope somebody else can use this!
Labels:
ck words,
double consonants,
spelling,
vegetables
Sunday, November 20, 2011
I Am Thankful!
I am thankful for so many things in my life! I really could go on and on about all the parts of my life that I am thankful. However, I will follow the format for this linky party, Fun!
1. What are you thankful for in your classroom?
I am thankful for having such an amazing group of co-workers. Our school theme this year is "Be A Hero" and on numerous occasions my great friends at work(shout out to Arllee, Sandy, Lynae and Meagan!) have helped me out. I just love how we all collaborate so well and it is so fun to see the progress of our students because of it! Also, I am VERY grateful for the administration at my school for supporting me in using Radiant Child Yoga in my classroom! They even paid for me to go to an awesome teacher training!
2. What person are you most thankful for?
My husband of course! He has inspired me to be brave enough to be the most authentic me I can be. He is so helpful and really can do pretty much anything! I mean he cooks, cleans, makes jewlery and pottery, teaches yoga, builds things, is a wilderness guide, river guide, is a surgical technician...etc. Right now he lives nine hours away from me! He is living in Santa Fe, NM going to school to become a doctor of Oriental Medicine. I am so proud of him and love sharing the last name of Matsuda!
3. What three blogs are you most thankful for?
Rachelle and Natalie from www.whattheteacherwants.blogspot.com! Rachelle and I grew up in the same small town and went to the same schools! Now that she is basically FAMOUS in the teacher/blogger world I feel really special to actually know her! Fun fact: My aunt is married to her uncle! Kinda fun :) Anyway, I am thankful for What The Teacher Wants because I know I have become a better teacher because of blogging and I found the teacher/blogger community through Rachelle!
Next up is Lindsey AKA The Teacher Wife from theteacherwife.blogspot.com! We both teach second grade in Utah so her TPT and TN products work very well for me! I just love all of Lindsey's super cute and effective ideas! I even got to meet her a few weeks ago and she is just as sweet in person!
Last but definitely not least would be Amy Lemons from stepintosecondgrade.blogspot.com. She is another fellow second grade teacher and her ideas are AMAZING!!! My partner teacher and I are always sharing ideas from her super cute blog!
4. What guilty pleasures are you most thankful for?
I am thankful for my TV shows! Especially having re-runs of my favorite show Dharma and Greg! I can totally relate to this show! :)
5. What are you most thankful for?
I am most thankful for my family and my health. I am really blessed to have such an amazing family that has loved and accepted me all along the way! I have had ups and downs with my health and I am so grateful that I have found the path of yoga and adopted a yogic lifestyle. I am so much healthier now then I have ever been.
There are so many fabulous teaching blogs out there and I am thankful for all of them!
4. What guilty pleasures are you most thankful for?
I am thankful for my TV shows! Especially having re-runs of my favorite show Dharma and Greg! I can totally relate to this show! :)
5. What are you most thankful for?
I am most thankful for my family and my health. I am really blessed to have such an amazing family that has loved and accepted me all along the way! I have had ups and downs with my health and I am so grateful that I have found the path of yoga and adopted a yogic lifestyle. I am so much healthier now then I have ever been.
Make sure and grab a copy of my "I Am Thankful..." student made book and have your students practice writing to show gratitude! Please follow me and leave me a comment if you download the book! Thanks everyone!!
(Click the picture to get your FREE copy!)
Friday, November 18, 2011
Just in time for Thanksgiving!
Thanksgiving is my favorite holiday. I love getting together with my family and eating lots of yummy food. However, we know that it is so much more then that and I also enjoy the whole reflecting on what we are thankful for part! It's a great strategy to make sure you can always make the sunshine... having an attitude of gratitude.
So I have made this book to help my students practice an attitude of gratitude. I just love this book because it is a great way to get younger people to think about being thankful for the simple things in life like nature all around us.
This idea was given to me the first year that I taught by a fellow teacher who had hand drawn the whole thing! I have recreated it with cute clip art and I want you to have it too.
Labels:
freebie,
Thanksgiving
Tuesday, November 8, 2011
Pssst.. We love fairy mist! (A classroom management tip)
Has one of your little darlings ever felt down in the dumps? Were they in need of a magic fairy to make their day all better? Then let me let you in on a little secret. Over here in my class where we are always trying to make the sun shine, we use rose water for its aromatherapy benefits.
According to aromatherapy and my own experience, rose water offers a soothing property to the nerves and emotional /psychological state of mind. It is regarded as an anti-depressant. Rose water/oil is increasingly used in treatments for conditions of stress like nervous tension, peptic ulcers and heart disease. Rose water is also used as an antiseptic. Not to mention is really does smell heavenly!
When I have a student that is having a bad day, feeling glum, or even if my entire class is just feeling lethargic. I will have them close their eyes and then I tell them they are going to be sprayed with fairy mist.
THEY LOVE IT!
Plus it really works!
This is my favorite brand to use. I usually pick it up at Whole Foods but you can order it online also! Click on the picture for a link to purchase your very own fairy mist! Did I mention you can get it for only $5 ?!
It always makes them feel better. There's nothing like a cold shot of fairy mist in the face to lighten the mood!
Here is a label you can print and put on your bottle to cutesy it up :)
Click on the picture for you copy.
Labels:
classroom management,
freebie
Monday, November 7, 2011
I'm back with a vertical, horizontal and oblique line activity and FREEBIE!
This weekend I went to lunch with some amazing fellow teacher/bloggers! You can see Rachelle and Natalie's post all about our get together here @ whattheteacherwants.blogspot.com These amazing women have certainly inspired me to keep up with blogging! So here is my first new post in a few months.
This is a fun, quick and easy activity that you can do with your students either in whole group or small group instruction. Here we are practicing vertical, horizontal and oblique lines. I have my students draw a picture of their choice but they can only do horizontal lines in black, vertical lines in red and oblique lines in blue.
I keep a visual reminder on my own white board after I model for them how to draw something using these three colors for their corresponding line.
Here are a couple of my students and their fabulous line drawings. They really enjoyed this activity. I asked them what type of lines they were for a simple assessment. It was a easy way to assess their learning.
I made a freebie for you just in case you want to use this in a center. You can do this with crayons, markers, colored pencils or paint!
Get the freebie here! There are two versions, one is has more scaffolding then the other.
Let me know if you download this and use it! I would love some feed back. Thanks!
Sunday, August 14, 2011
Classroom Library and Safe Place
...I can say that this is basically my PRIDE and JOY! I'm not even going to pretend that I am humble about it because I am not. I LOVE the safe place that my husband and I made together. I LOVE the barn owl stuffed animal that I put in the top. I LOVE that I only spent $18 to make it. I am so excited for my new little darlings to see it on the first day of school!
I used: branches found at the community compost pile, peacock feathers, white netting used at my wedding (purchased at IKEA in the curtain section), a barn owl stuffed animal, floral moss, pillows, screws, and pieces of ply wood.
We made a base for the branches to be screwed into through the bottom. We figured out the angle of the branches and then cut them at that angle so that way when they were screwed in they would be at the right angle. Hope that makes sense?!
Figuring out the angle for the branches. After it was all screwed together I covered the base with fabric using a glue gun so that my students won't be able to get slivers even if they tried! Ha!
I tied the white netting on just how I liked it. Then I used the floral moss to cover up the screws and for decoration. I added the feathers and owl for the final touches :)
The library baskets are not sorted yet. I work at a charter school and a part of our charter is parent volunteering. I am going to have one of my parent volunteers sort them by genre.
So you may be wondering... What is a safe place?
Well a Safe Place is something that at our school is a requirement for every classroom. The main things that distinguish a safe place from any other spot in a classroom would be:
* A safe is a place where students can go to when they feel the need to remove themselves from the group.
* This is a place that is NEVER to be used as a punishment. (You would never tell a student to go there.)
* Students are still responsible for their learning and work.
* It is meant to be a special place. It can look like a chair, couch, rug with pillows, tent, tee-pee, etc. It's a location in the room where they can go and not be bothered.
* It is a place where students can go to practice self regulation strategies like using a mantra to calm down. Feather breathing, yoga, thinking happy thoughts, etc.
* There should only be one student in the safe place at a time.
The students should have some input in making the safe place special. So this year my students are going to write/draw about a time when they felt happy and/or safe. Then they will crumble them up and put them in a plastic egg. Together we will make a "birds nest" since we have an owl themed classroom this year and put all of the eggs in the nest. The nest will be placed in the branches at the top next to the barn owl.
Some other ideas to make your safe place special and kid included would be to have them bring pictures of their family. Make class expectations together for the safe place.
Do you have a safe place in your room? Can you think of another way to have the students contribute to the safe place?
PS This is how the white netting was used at my wedding... We were married under my favorite tree in my parents back yard.
Labels:
library,
safe place
Subscribe to:
Comments (Atom)


