Friday, January 6, 2012

Jellyfish Art!

This week the book in our Journey reading program is Jellies, The Life Of Jellyfish by Twig C. George.  This is an excellent informational text with great pictures!  My kiddos loved learning all about jellyfish!  


{click on the picture to get your own copy!}


Fun facts about jellyfish:


* Jellies do not have brains or hearts.
* They can only go up and down.
* Their tentacles sting for protection and to catch food.
*Australian box jellies are more dangerous than a cobra!
*Some even grow their own algae for food.
*The Arctic Lion's Mane jellyfish can grow to be as long as a blue whale!!!


I also made one of these awesome DYI jellyfish.  I used it as a motivational tool during whole group reading.  I moved it from desk to desk while we were reading.  They only get a turn if they are following along and reading together. I am going to have it out so they can play with it when they finish their work early.  


{click the picture to check out this fun moms great blog!}


Here are the steps to make the art project we did today!

Materials needed:


thin see through wax paper sheets
crepe paper
glitter paint
paint brushes
glue sticks
scissors
pencils


Helpful hint:  become good friends with the lunch lady (THANKS TEDDI!) then when she least expects it hit her up for large wax paper sheets like these ones.  ;)  They aren't very waxy at all.  They are more like grease blotting sheets. 


(I couldn't find a picture of the large sheets)


First, fold the wax paper in half, hot dog style.  Then, outline the shape of your jellyfish.  Make sure you start at the top of the fold.  You will need to be able to open them up.  Just like in nature, our class came up with many different styles of jellies.


Next, cut out the jelly body making sure not to cut the fold on the top so you can still open it up.  Carefully cut both sides at the same time so that they line up.  I tell my students to make sure to pinch the paper together so that it doesn't slide around.  Also it helps if they keep the tip of their scissors on their desk while cutting.  The paper needs to stay flat on their desk to do that.  

After cutting it out.  Open up the jelly and glue strips of crepe paper on the bottom for tentacles. 


 If they drape the tentacles over the edge of their desk then everyone has enough room to work create.  


After that pass out paint brushes and paint.  Paint the inside first.  It makes it easier if you paint the side with the crepe paper.  That way, when you fold it back together it's not as messy.  After it's folded back together paint the top.  


If you use the thin wax paper then when you fold it back together you can see the paint from both sides.  I also let them paint to top when it's closed because painting is just so much fun!


Here is the final product!


I'm going to hang them from the ceiling this weekend.  I'll add add a picture once they're up!  I just love how they turned out.  They are going to add some fun color to our room!  


Tuesday, January 3, 2012

Crazy Contractions!

We went back to school today and honestly we had a BLAST!  I felt so refreshed from the break.  I turned my computer off on the 21st and didn't turn it back on until yesterday!  


The hubby and I went to Colorado to visit his family and friends for Christmas.  Along the way we even hit up two hot springs.  We LOVE hot springs and go as often as we possibly can!!!  We stayed at the Glenwood Hot Springs Lodge  nestled in the heart of the Rockies.  But I must admit I prefer this hippie dippy place over a 4 star chlorinated pool any day!  At Mystic Hot Springs in Monroe, Utah you can have an official hippie vacation complete with a stay in a spray painted hippie bus!  Check it out.


At school today we practiced contractions and had so much fun doing so!

First things first.  I copied this anchor chart word for word from the cutest blogger ever, I am sure you all know her, Babbling Abby!  The kiddo's took turns highlighting the letters that are replaced with the apostrophe.  Make sure you go to her blog here and see all of her fabulous ideas for contractions and so much more!  Thanks Abby!


Next, we practiced writing our contractions using this worksheet that I made.  


WARNING: THIS WORKSHEET HAS ZERO CUTE CLIP ART!  EEEEEK!


Note: I have my students read the words out loud while tracing them and say "plus" while writing a plus sign and say "equals" while writing an equal sign.


Then, my kiddos did surgery on their words to make them into contractions like  Lauren from The Weekly Hive did here.  I recently started blog stalking her super helpful blog.  She is so creative so make sure you check it out!  Thanks Lauren for the great ideas!


{you can download the contraction packet here for free!}


I am trying not to spend any of my own money on my class room.  So instead of using band aids my class used masking tape for the apostrophes.  Luckily for my kiddos our sweet office lady, who is also our principals wife (fun huh!), let us have a box of face masks!!   


P.S. An Aide from the high school side walked by our classroom and thought someone in our class had a bad virus or something.  She was confused about why everyone had masks on.  LOL


Finally, drum roll please........

This is the surprise my class will see in the morning.


Here's what you do!


 On two little pieces of paper write the two words that you are going to combine to make a contraction.


Fold up the words and stuff them into the balloon.  


Blow the balloon up and tie it.  Then write the contraction on the outside.  


Tomorrow each one of my little darlings will get a chance to pop their balloon and read the words inside!  I have a feeling they are going to LOVE it!


Friday, December 16, 2011

Greater Than Less Than - Grinch Style!

    I am incredibly lucky to work with Lynae, the very creative math specialist extraordinaire!  Her job is to create engaging math centers to help fill in the gaps in our students learning during our interventions time.  She does this for k-6 grades.  Every week!  She is AMAZING!!


This weeks she came up with this fantastic idea.  She used the beloved Dr. Seuss character the Grinch in the most fantastic way.


She found an image on google, printed them off, cut off one arm and taped it to make the greater than and less than signs!  She put glitter glue to emphasize the signs but some of my little darlings pulled it off.   :(


    Then she made Santa bags with different numbers on them.  Our students had to put the correct Grinch in the middle to show their understanding.  {LOVE IT!}


What do you think?  Is this something you might use in your classroom?  


Sunday, December 11, 2011

Get 'em While They're Hot! Coin Posters Freebie!

So I ordered DJ Inkers Kidoodlez: Science and Math CD.  Let me just tell you.....I LOVE all of the super cute and useful images that come on this CD! 


(Click on the picture to get your own copy!)


There are so many fantastic images to use.  This is the first resource I have created with it.  I have updated my money posters and created one for the half dollar which I didn't have.  I am not the greatest poet so if you know of or think of a better poem to use for the half dollar please let me know and I will make a poster with it!  


(Click the picture to grab a copy of the Coin Posters)

Please leave me a comment if you download the coin posters!  I love hearing from all of my blogging friends!  {HUGS}

Thursday, December 8, 2011

Hooray For Awards!

Big thanks to Barb from Grade ONEderful for awarding me the the Liebster Blog Award!  Isn't she a sweetie! I feel so special.  Now I know how my student of the week feels when they receive their certificate! ;) ?


The goal is to spotlight 5 other up-and-coming blogs with less than 200 followers!

Here are the fabulous blogs I am passing this along to :)


Congratulations blogging buddies!

Wednesday, December 7, 2011

Easy Peasy Symmetry

Today I introduced symmetry during math.  First I showed them what symmetry meant using our bodies as an example.  Then we used shapes and we practiced drawing lines of symmetry on them.  We folded them on the lines to double check that they were actually symmetrical.   After that we created these fabulous symmetrical works of art!  


So here is an easy art project that is sure to get oooh's and aaaah's from all of your little darlings.  


First have your students fold construction paper in half hamburger style.  Then go around and ask each child what colors they would like.  I let them choose three colors.  


Next fold the paper back up and spread the paint out by pressing on the paper from the fold to the front opening.  If they spread it from side to side it will spill out the sides and be really messy.  


When they open up their paper they will find a beautiful symmetrical painting will have appeared like magic!  Followed by the oooh's and aaaah's...


Helpful hint:


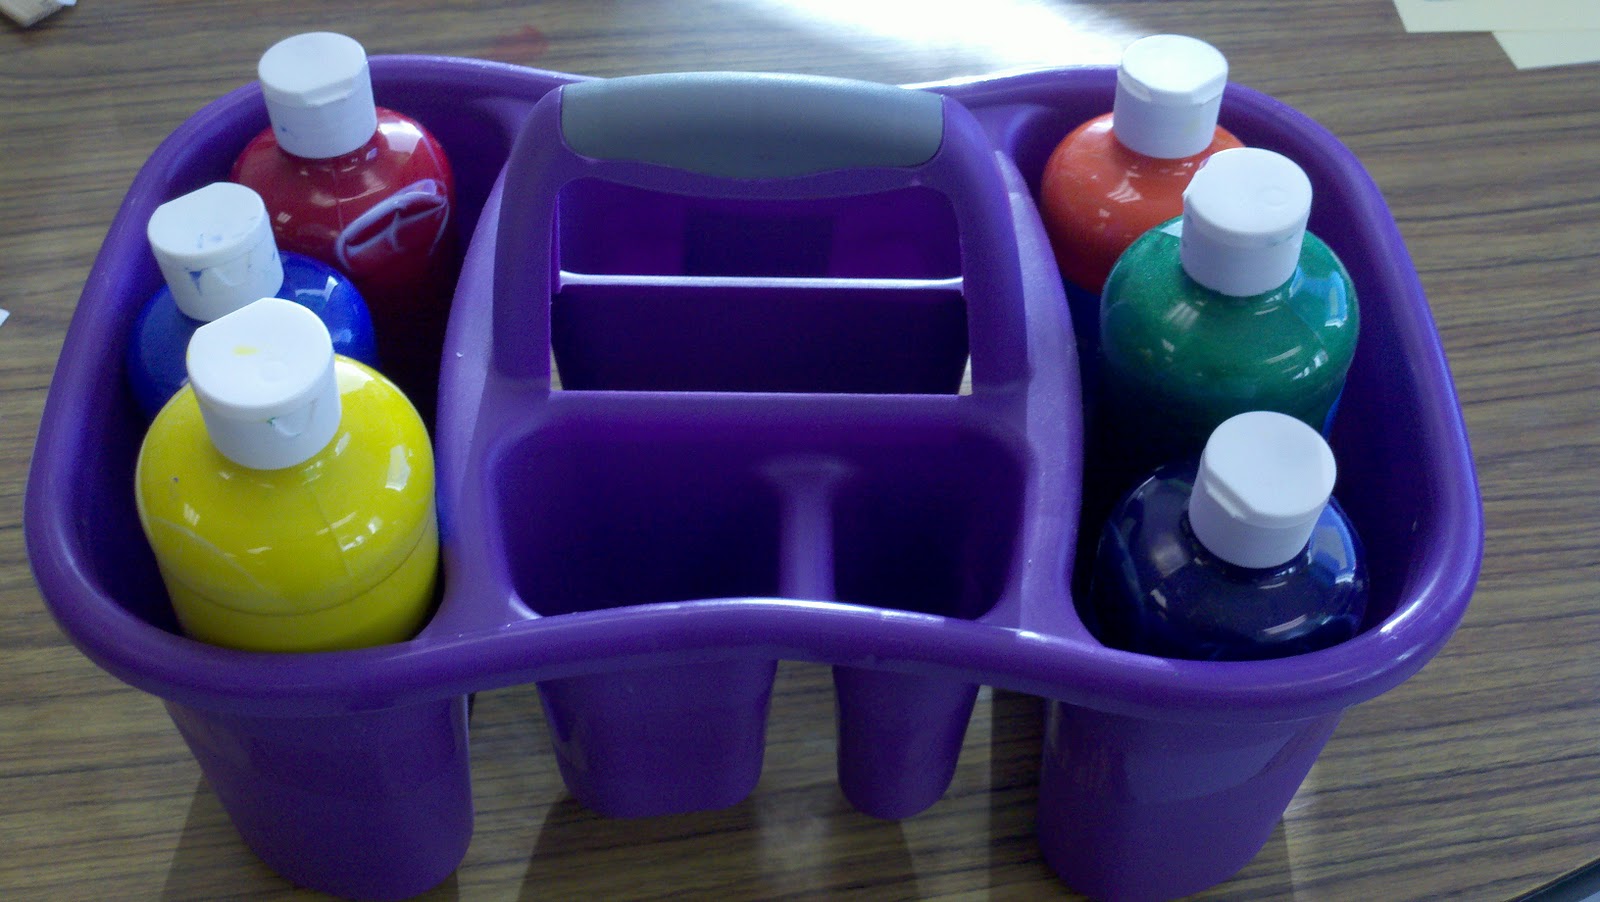
I put the paint in a shower tote so that I can easily carry them from table to table.  


Then I had my students write about their symmetrical paintings in their math journals.  You know how the Common Core loves for our kiddo's to write about math!

They had to answer these two questions in their writing: What does your picture look like?  What does symmetrical mean?  

Here are some student examples....


and 


Friday, December 2, 2011

A pinterest inspired Christmas!

Is it Friday already?!  This week as FLOWN by!  We have been super busy and I wanted to share a few things we accomplished this week.  


I was pretty inspired by this cute door I found on pinterest.  One of my parent volunteers brought this super fun work of art to life on our classroom door!  
Let me tell you it has been that talk of the first floor, the kindergartners especially love it!


I also loved this cute Grinch idea I found also on pinterest.  


I made him by using my elmo document camera to shine the picture onto my smartboard where I taped a piece of green paper and then traced the outline of the Grinch.  Then I had it laminated.  


My students are going to catch their classmates in acts of kindness.  Write them down on a heart and tape it to the Grinch.  

I have a basket with red paper, scissors, a marker and I added tape after I took this picture.  


Update:

Look how kind my class is!


Remember Rachelle's post about 3d leprechauns back in March?  I used that idea and we made Santa's Elves instead.  


The placement of my elves is totally driving me crazy.  I had my cute student service learner from the high school hang them up. :)  I didn't have a Christmas border so my students made their own.


If you want the posters I made for the Grinch or Santa's Elves leave me your e-mail and I'll send them to you!  I have to go to a faculty meeting now :)